HP Ink Tank 310, 410 Printers - Loading Paper, Envelopes, Cards - HP Ink Tank 315
HP Ink Tank 310, 410 Printers - Loading Paper, Envelopes, Cards
This document is for HP Ink Tank 310, 311, 315, 316, 318, 319, Wireless 410, 411, 412, 415, 416, 418, and 419 printers.
This document provides instructions for loading plain paper, photo paper, and envelopes into the printer.
Load plain paper
Load plain paper into the printer for basic printing tasks.
-
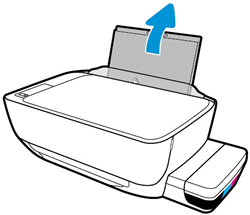
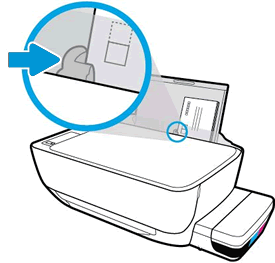
Raise the input tray.
-
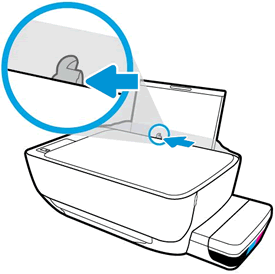
Slide the paper width guide all the way to the left.
-
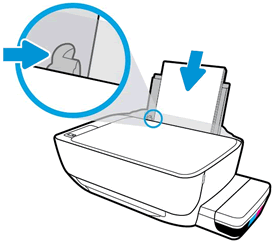
Load plain white paper into the input tray, slide the stack of paper down until it stops, and then slide the paper width guide against the edge of the paper.
-
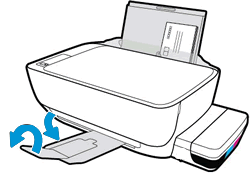
Pull out the output tray, and then raise the tray extender.

NOTE:Before printing, select the correct paper size and paper type settings from the computer.
Load photo paper or cards
Load photo paper or cards, such as Hagaki postcards, into the printer.
-
Raise the input tray.
-
Slide the paper width guide all the way to the left.
-
Load a stack of photo paper or cards into the input tray with the short edge down and the print side up. If you are loading photo paper with perforated tabs, load the paper so that the tabs are on top.Slide the stack of paper in until it stops.
CAUTION:
Do not load photo paper while the printer is printing. Jams or paper feed issues might occur.
-
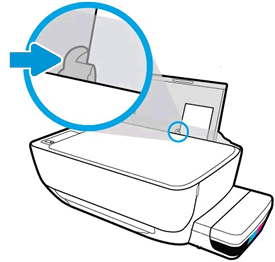
Slide the paper width guide to the right until it stops at the edge of the photo paper.
-
Pull out the output tray, and then raise the tray extender.

-
Do not leave any photo paper in the input tray after you finish printing, as the quality of the paper might deteriorate. Store photo paper in a sealed bag in a cool, dark place.
NOTE:Before printing, select the correct paper size and paper type settings from the computer.
Load envelopes
Load the printer with blank envelopes to print addresses for the recipient and the sender.
NOTE:You can load one or more envelopes in the tray, but do not load more than five envelopes at a time. Do not use shiny or embossed envelopes or envelopes that have clasps or windows.
-
Raise the input tray.
-
Slide the paper width guide all the way to the left.
-
Load one to five envelopes into the far-right side of the input tray. Insert the envelopes with the print-side facing up and the flap-side facing down against the tray.
-
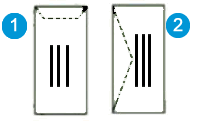
If the envelope flap is on the long edge of the envelope, insert the envelope with the flap-side positioned to the left.
-
If the envelope flap is on the short edge, insert the envelope with the flap-side positioned up, to the top.
-
Envelope with flap on short edge
-
Envelope with flap on long edge
CAUTION:
Do not load envelopes while the printer is printing. Jams or paper feed issues might occur.
-
-
Slide the paper width guide to the right until it stops at the edge of the envelopes.
-
Pull out the output tray, and then raise the tray extender.
NOTE:Before printing, select the correct paper size and paper type settings from the computer.
https://support.hp.com/us-en/document/c05627778


Comments
Post a Comment